

How to Refactor an RxSwift Monolith into a Modular Swift App
- Architecture, Clean Code, Mobile, Swift, Tests
- 22 min read
Listen to article
Imagine a quarter-long refactor: turning a big ball of mud, held together by RxSwift and 1500-line view models, into a modular, fully testable codebase. All while actively developing other features and shipping the app. What triggered that massive refactor? An innocuous estimation request. And a decision that shaped the future of this project.
The CTO scheduled a meeting to discuss a new device the iOS app needed to support. The project finally got the green light. The rollout plan was staged: trusted partners first (to gather feedback), then influencers (for publicity), then the general public. Our job was to ship support quietly, well ahead of launch, so it would already be there when customers got their hands on the devices. The catch: nothing about the new device could be visible until the app confirmed the user actually had one. Pair successfully, and the new experience unlocks. Until then, everyone sees the existing flow.
After going through the design documents, the CTO asked: “How long will this take?”
The job seemed easy. Just pass a device status flag into a view factory and produce the right view variant. A week? Two max.
Unless… there was no view factory. Instead, there was one SwiftUI view handling every state of the entire sync flow, backed by DeviceSyncViewModel: 1500 lines of RxSwift written by seven developers over five years…
It was time to decide: Keep playing in the mud, or Boy-Scout our way out of this nightmare?
The Starting Point (No Sugarcoating)
Before committing to any estimate, I did what you should always do before touching a legacy codebase: I looked honestly at what we actually had.
Single Xcode target, SPM, Carthage and CocoaPods. Yes, all 3 dependency managers coexisting together. RxSwift not just as a pattern but as the connective tissue binding the entire app together. View models that had grown into de facto feature coordinators. Almost no tests, etc.
And the business wasn’t stopping. Features were being shipped. New developers were joining and writing code in the same patterns they found, because that’s what the codebase taught them. Every week without a plan was only making our cute little pool of mud a little bit deeper.

The goal was never a full rewrite. Rewrites usually fail. The business doesn’t pause while you rebuild from scratch. Especially that, without addressing the core issues, you inevitably recreate half the bugs you were trying to fix. I’ve seen it happen. Hell, I’ve been part of it happening!
What we needed was surgical migration towards modularity. Keep shipping. Improve what you touch. Leave every file better than you found it. Important: not perfect, just a bit better. Clearer, focused, tested. You might know this as the Boy-Scout Rule. We turned it into a system.
The plan had 5 stages. Two non-negotiable rules: add tests for whatever you touch, and strip RxSwift wherever it’s safe to do so. The target structure looked like this:
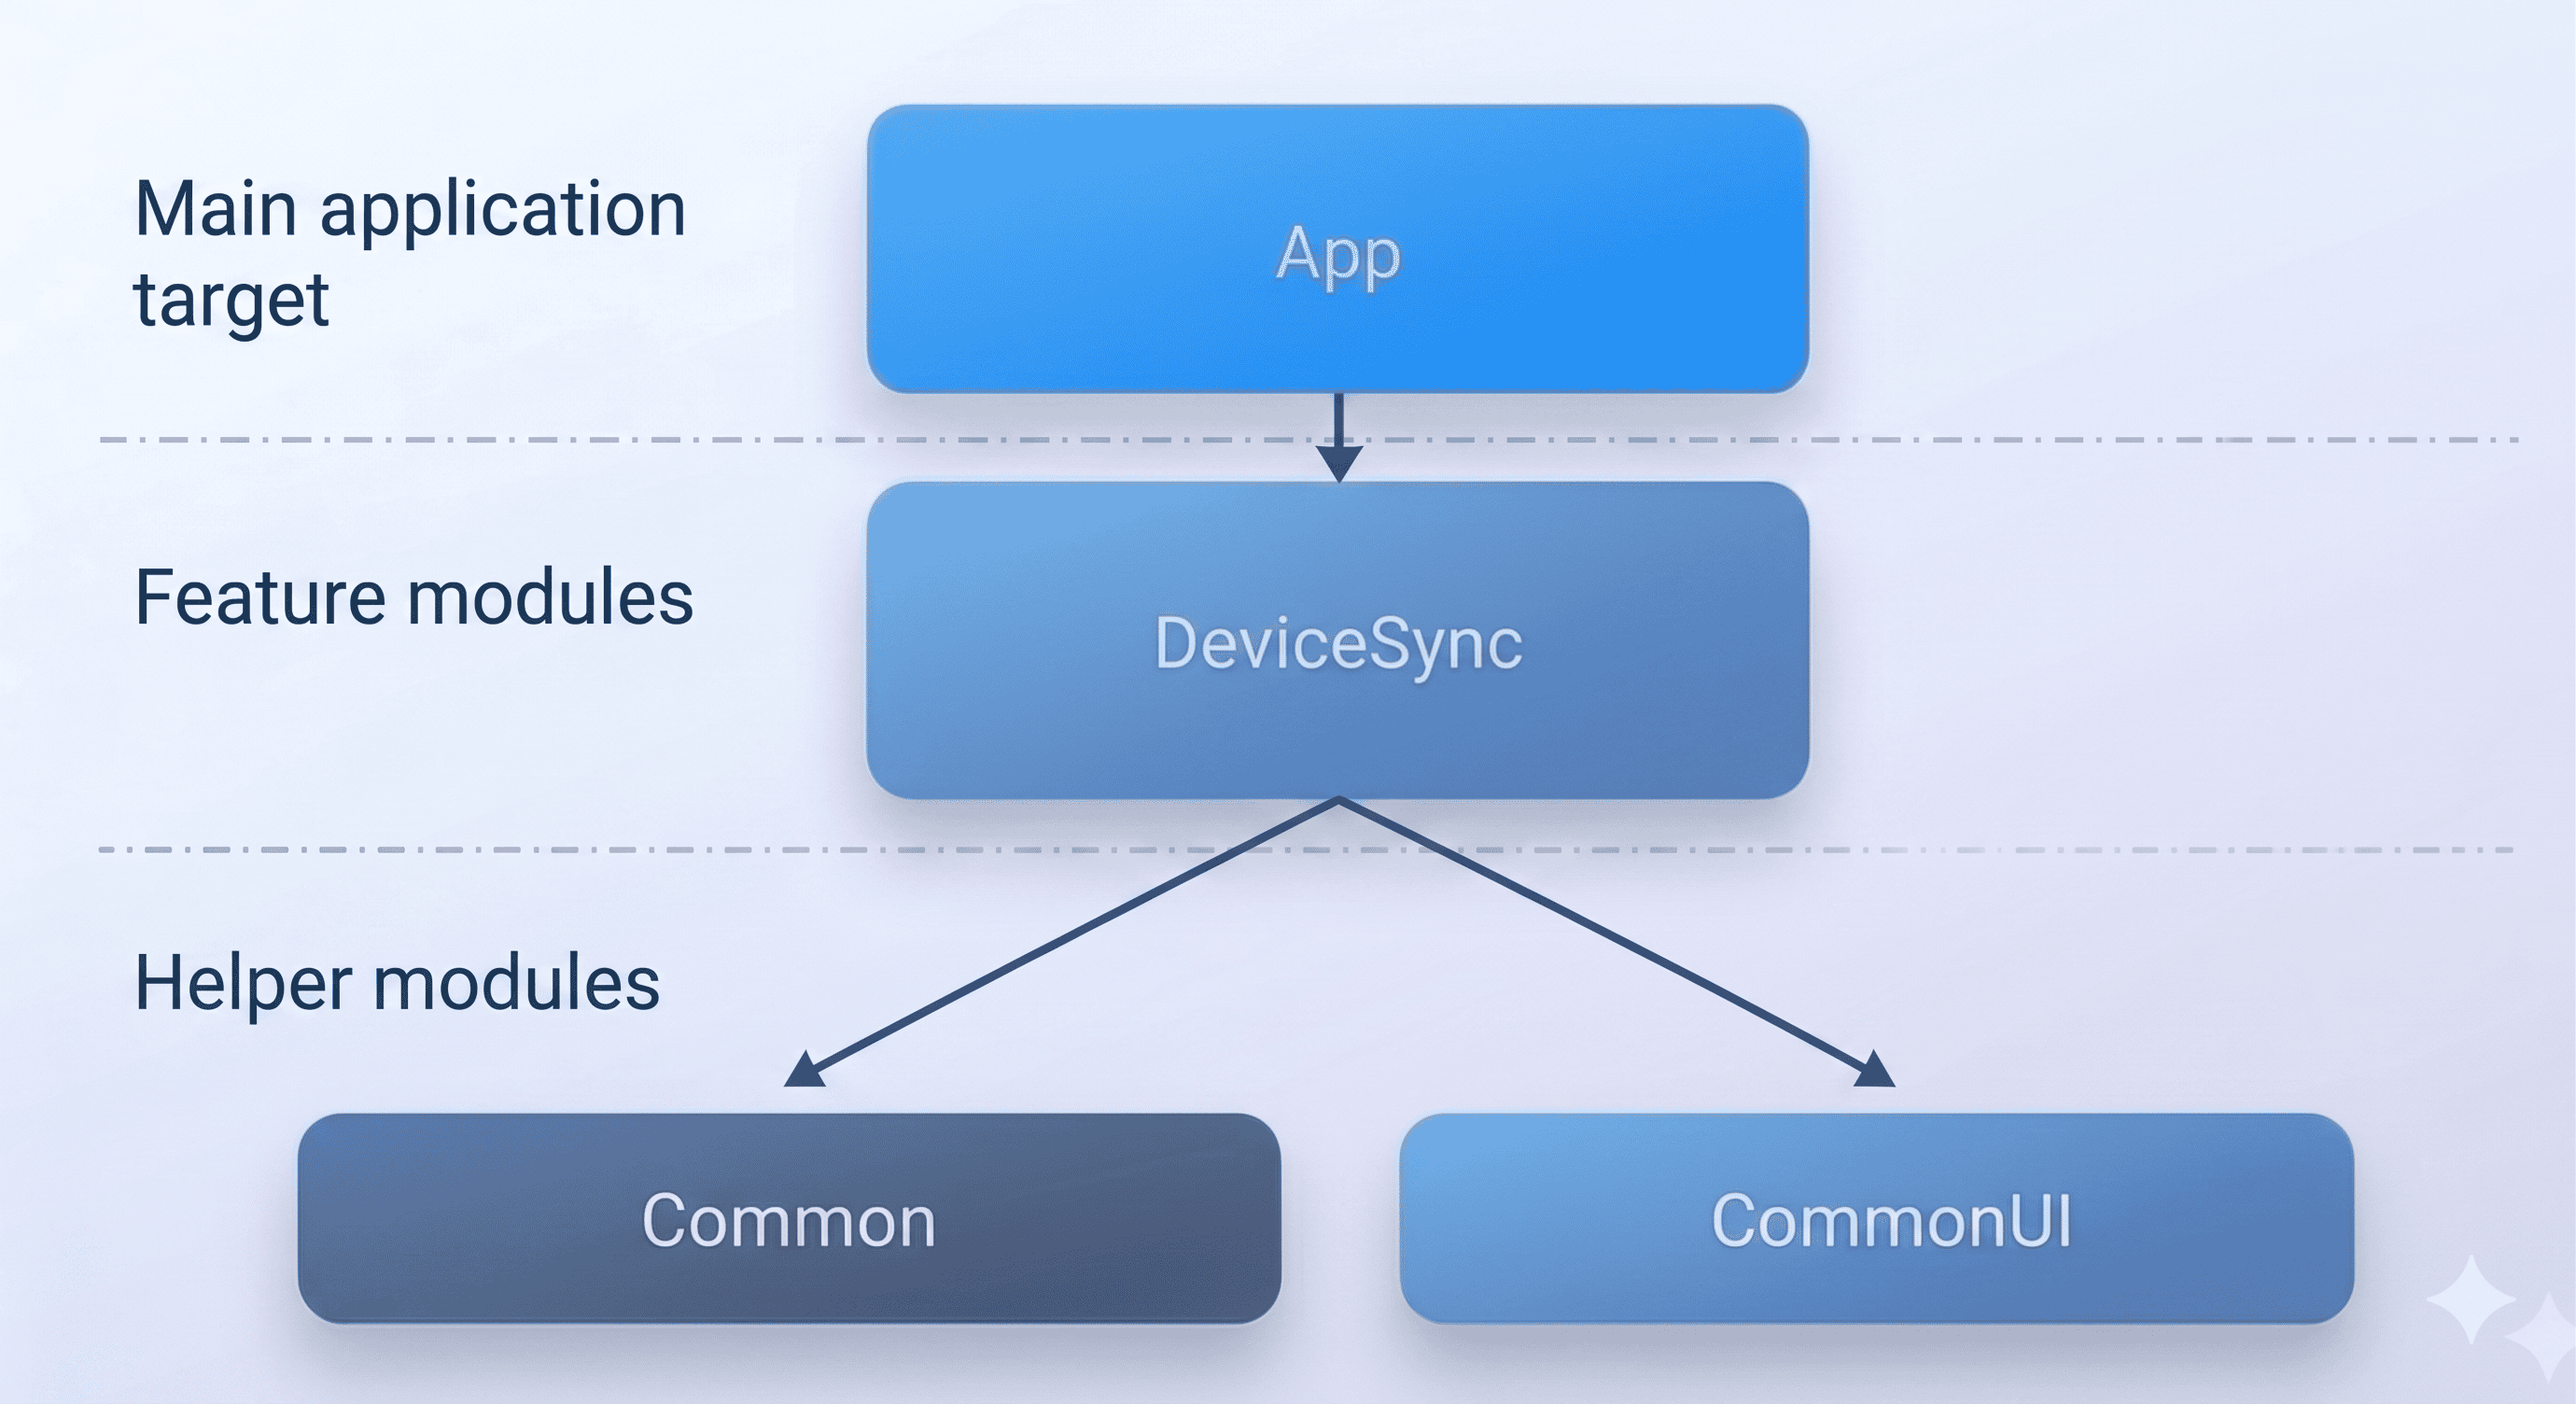
Three modules. One direction of dependencies. Everything else stays in the main target. For now.
Stage 1: Building Modular Foundations
We started with creating these two SPM modules, hooked into the project as local packages. The gentlemen’s agreement we’ve made to ourselves was simple: every time we touched a utility, an extension, a reusable view, or a helper anywhere in the app, let’s move it to one of the modules. Let’s strip it from RxSwift and add comprehensive tests. No exceptions. If you want the broader picture of why this pattern works, I covered it in detail in my post on modular iOS architecture.
I vividly remember the first files I migrated: a humble URL builder and AppSpacings, the smallest app style component I could find. The next moves were equally unglamorous: a reusable button here, a string formatter there. Nothing to brag about.

But a couple of weeks in, something shifted. New code being written anywhere in the app started reaching for the modules first. The devs started asking: Should this go in Common? without being prompted. The codebase had started teaching itself.
The rule about tests was the real win. Anything moved into a module got coverage as part of the migration. And because we added coverage visualization for every file touched in the update, it was immediately obvious when tests were missing. No more we’ll add tests later tickets. As a result, Common and CommonUI held a consistent 90% test coverage from the start. Not because we tried harder, but because the rule made it the path of least resistance.
The RxSwift rule was harder to uphold. Most utilities migrated cleanly – they had no business being reactive in the first place. But every now and then, you’d hit a helper that was load-bearing for some Rx chain elsewhere in the app. The choice was always the same: either rewrite the call sites too (often a much bigger job than the helper itself), or move the helper into the module with its Rx surface and mark it for cleanup later. We did both, depending on the blast radius. Pragmatism beats purity every time.
By the end of Stage 1, neither module looked like much from the outside. A few hundred files of utilities and shared UI. But underneath, two things had changed: we had a place to put new code that wasn’t the monolith, and we had a working pattern the team understood. That was the actual deliverable. The code was just the side effect.
Stage 2: Refactoring the Device Synchronization Pragmatically
This is where the original plan met reality. The intent was clean: extract everything related to device synchronization into its own module. Strip the RxSwift while we were at it, exposing a tidy async/await API.
We started with the obvious stuff – the data models describing what gets synced from the device, the simple value types, the constants. Easy wins. Moved them in, added tests, stripped Rx where it appeared. No drama.
Then we got to the synchronization core: a wrapper around the SDK that managed the Bluetooth connection, handled communication with the device, and contained the orchestration logic that drove the whole flow. Rx everywhere. Observable chains forty operators long. And, naturally, almost no tests.
We tried. We sat down to bridge it to async/await. Within a day it was clear what we were actually doing: rewriting an untested system while simultaneously restructuring it. Two risky operations stacked on top of each other, on the most business-critical flow in the app. Any bug we introduced would land directly on users trying to sync their device.

So we made the call: move what we can, test it, and clean it up later. The Rx code embedded in the SDK wrapper and repositories came along for the ride into the module, untouched. Same code, same behaviour, just relocated. The simple, well-understood pieces around it got the full treatment: async/await, fresh tests, no Rx. The complex, stateful core stayed in the main app target for now.
This is the part of the migration story most blog posts skip. Knowing when not to refactor is a skill. Every senior dev learns it the hard way: not every piece of legacy code is ready to be modernised in place. Sometimes the right move is to draw a clean boundary around it, leave it running, and return when you have the tests, time, and team confidence to do it properly.
The boundary was what mattered. Once most of the synchronization logic lived in its own module, the messy internals stopped being everyone’s problem. The rest of the app interacted with it through a carefully designed, simple, and tested API. Everything behind that API was just implementation details. Imperfect, dirty, polluted with legacy tech, but working. With tests in place, we could keep improving it without fear of serious regressions. The blast radius was contained.
Although Stage 2 didn’t end with a clean async/await rewrite, it yielded something equally useful. First: a set of imperfect-but-working building blocks we could use to create new flows in the app that required communicating with the device. Second: a module we could keep migrating on our own terms, without holding the rest of the work hostage.
Stage 3: Making Modules Look Like the App
Let’s address the elephant in the room: how do we ensure that UI components defined in a module look and feel like the rest of the app? Each module we create starts out… naked. It has no way of knowing how the UI it defines should look, and it shouldn’t. That’s the main application’s job.
Fortunately, the answer is relatively simple: we can encapsulate the entire application style in a tidy set of providers and inject them into the module at runtime. To do that, we need to split the styling system in two:
- The style abstractions:
Structs and protocols that describe colors, fonts, spacing, shapes, and more. We define these in the lowest and most widely used module in the hierarchy: CommonUI. Pure Swift, no values, just shape:AppColors,AppFonts,AppSpacing. Anything in any module can referenceAppColors.primaryAccentwithout knowing or caring what the actual color is. - The actual style values:
The production brand colors, the asset catalogs, the font files, and more. These must be defined in the main app target. That is where they belong. Modules should not ship with hardcoded brand identity. They should adapt to whatever brand identity the app provides, especially if the style is controlled remotely, for example by triggering an A/B test.
I know what you might be thinking: That’s a lot of components to pull from the app’s DI pipeline. Fortunately, we can easily wrap them into a single abstraction: the AppStyleProvider. And it can be injected via @Environment:
struct AppStyleProvider {
    let colors: AppColors
    let fonts: AppFonts
    let spacing: AppSpacing
    // If we chose to, we can add more app style abstractions here,
    // e.g.: animations, symbols, images, etc.
}

// Registering AppStyleProvider with SwiftUI Environment:
extension EnvironmentValues {
    var appStyle: AppStyleProvider {
        get { self[AppStyleKey.self] }
        set { self[AppStyleKey.self] = newValue }
    }
}
struct AppStyleProvider {
let colors: AppColors
let fonts: AppFonts
let spacing: AppSpacing
// If we chose to, we can add more app style abstractions here,
// e.g.: animations, symbols, images, etc.
}
// Registering AppStyleProvider with SwiftUI Environment:
extension EnvironmentValues {
var appStyle: AppStyleProvider {
get { self[AppStyleKey.self] }
set { self[AppStyleKey.self] = newValue }
}
}Any view in any module can now reach for @Environment(\\.appStyle) and render using the actual production style. The only requirement is that the root view injects the real provider:
/// Wraps the view in a `UIHostingController`.
/// Provides necessary environment values for app style.
func toViewController(
    appAssetsProvider: AppAssetsProvider? = nil,
    appStyleProvider: AppStyleProvider? = nil,
    traitCollectionProvider: TraitCollectionProvider? = nil,
    ...
) -> UIViewController {
    let rootView = self
        .withEnvironmentDependencies(
            appAssetsProvider: appAssetsProvider,
            appStyleProvider: appStyleProvider,
            traitCollectionProvider: traitCollectionProvider,
            ...
        )
        .anyView

    return UIHostingController(rootView: rootView)
}
/// Wraps the view in a `UIHostingController`.
/// Provides necessary environment values for app style.
func toViewController(
appAssetsProvider: AppAssetsProvider? = nil,
appStyleProvider: AppStyleProvider? = nil,
traitCollectionProvider: TraitCollectionProvider? = nil,
...
) -> UIViewController {
let rootView = self
.withEnvironmentDependencies(
appAssetsProvider: appAssetsProvider,
appStyleProvider: appStyleProvider,
traitCollectionProvider: traitCollectionProvider,
...
)
.anyView
return UIHostingController(rootView: rootView)
}and:
public extension View {
    /// Injects environment dependencies (assets, styles, theme, etc.) into the view.
    /// Use this when you need to manually configure environment before passing to a custom UIHostingController subclass.
    func withEnvironmentDependencies(
        appAssetsProvider: AppAssetsProvider? = nil,
        appStyleProvider: AppStyleProvider? = nil,
        traitCollectionProvider: TraitCollectionProvider? = nil,
        ...
    ) -> some View {
        modifier(
            EnvironmentDependenciesModifier(
                appAssetsProvider: appAssetsProvider,
                appStyleProvider: appStyleProvider,
                traitCollectionProvider: traitCollectionProvider,
                ...
            )
        )
    }
}

...

private struct EnvironmentDependenciesModifier: ViewModifier {
    let appAssetsProvider: AppAssetsProvider?
    let appStyleProvider: AppStyleProvider?
    let traitCollectionProvider: TraitCollectionProvider?
    ...

    func body(content: Content) -> some View {
        let resolvedAssetsProvider = appAssetsProvider ?? DI.resolve()
        let resolvedTraitProvider = traitCollectionProvider ?? DI.resolve()
        let resolvedStyleProvider = appStyleProvider ?? DI.resolve()
        ...

        content
            .environment(\\.appAssetsProvider, resolvedAssetsProvider)
            .environment(\\.appStyleProvider, resolvedStyleProvider)
            .environment(\\.traitCollectionProvider, resolvedTraitProvider)
            ...
    }
}
public extension View {
/// Injects environment dependencies (assets, styles, theme, etc.) into the view.
/// Use this when you need to manually configure environment before passing to a custom UIHostingController subclass.
func withEnvironmentDependencies(
appAssetsProvider: AppAssetsProvider? = nil,
appStyleProvider: AppStyleProvider? = nil,
traitCollectionProvider: TraitCollectionProvider? = nil,
...
) -> some View {
modifier(
EnvironmentDependenciesModifier(
appAssetsProvider: appAssetsProvider,
appStyleProvider: appStyleProvider,
traitCollectionProvider: traitCollectionProvider,
...
)
)
}
}
...
private struct EnvironmentDependenciesModifier: ViewModifier {
let appAssetsProvider: AppAssetsProvider?
let appStyleProvider: AppStyleProvider?
let traitCollectionProvider: TraitCollectionProvider?
...
func body(content: Content) -> some View {
let resolvedAssetsProvider = appAssetsProvider ?? DI.resolve()
let resolvedTraitProvider = traitCollectionProvider ?? DI.resolve()
let resolvedStyleProvider = appStyleProvider ?? DI.resolve()
...
content
.environment(\\.appAssetsProvider, resolvedAssetsProvider)
.environment(\\.appStyleProvider, resolvedStyleProvider)
.environment(\\.traitCollectionProvider, resolvedTraitProvider)
...
}
}In isolation, modules get a sensible preview default:
// Injecting placeholder values to let the module compile.
// At runtime, these would be replaced with production values.
private struct AppStyleKey: EnvironmentKey {
    static let defaultValue = AppStyleProvider.preview
}
// Injecting placeholder values to let the module compile.
// At runtime, these would be replaced with production values.
private struct AppStyleKey: EnvironmentKey {
static let defaultValue = AppStyleProvider.preview
}In short, this is the SwiftUI-native answer to the How do modules access the design system? question. If you would like to go deeper, see my article on dynamic, remote app styling.
Stage 4: Making Modules Look Right in Tests
Once views in modules could access production styles at runtime, we wanted them to look right in tests too. Specifically, snapshot tests in modules needed access to production assets. After all, what is the point of rendering a view with default colors, fonts, and placeholder images?
The solution had two parts: a script that copies production assets into each module’s test target at build time, and a fake AppAssetsProvider that knows how to serve them at runtime. We asked the AI coding assistant to generate both. The script came out small and easy to read: it simply mirrors the main app’s Assets.xcassets and Fonts/ folder into each test target’s Resources/ directory, then runs SwiftGen so each target gets type-safe accessors. In theory, you can even get away with just linking app assets to test folders instead of copying them. Worth trying out if your app has a lot of heavy assets.
# Copy production assets + fonts into a test target's Resources folder
# so SwiftGen has fresh inputs when it runs afterwards.
copy_test_assets() {
    local target_name="$1"
    local test_resources="$2"

    rm -rf "$test_resources/Assets.xcassets"
    cp -R "$MAIN_APP_ASSETS" "$test_resources/"

    mkdir -p "$test_resources/Fonts"
    cp "$MAIN_APP_FONTS"/*.ttf "$test_resources/Fonts/"
}

copy_test_assets "CommonUITests"   "$PROJECT_ROOT/Packages/Tests/CommonUITests/Resources"
copy_test_assets "DeviceSyncTests" "$PROJECT_ROOT/Packages/Tests/DeviceSyncTests/Resources"

swiftgen config run --config "$PROJECT_ROOT/swiftgen-tests.yml"
# Copy production assets + fonts into a test target's Resources folder
# so SwiftGen has fresh inputs when it runs afterwards.
copy_test_assets() {
local target_name="$1"
local test_resources="$2"
rm -rf "$test_resources/Assets.xcassets"
cp -R "$MAIN_APP_ASSETS" "$test_resources/"
mkdir -p "$test_resources/Fonts"
cp "$MAIN_APP_FONTS"/*.ttf "$test_resources/Fonts/"
}
copy_test_assets "CommonUITests" "$PROJECT_ROOT/Packages/Tests/CommonUITests/Resources"
copy_test_assets "DeviceSyncTests" "$PROJECT_ROOT/Packages/Tests/DeviceSyncTests/Resources"
swiftgen config run --config "$PROJECT_ROOT/swiftgen-tests.yml"We wired this into the same script that generates the Xcode project file. One call, and the entire project is set up and ready to run. No manual asset copying needed. No forks of the design system either.

The runtime side is a FakeAppAssetsProvider with a withProductionAssets factory. Tests don’t construct app style manually. They just call the factory, pass in their own Bundle.module, and get back a provider that resolves real assets from the copied production app style:
public extension FakeAppAssetsProvider {

    /// Returns a fake configured to load production assets from the caller's
    /// test bundle (typically `Bundle.module`). Used by snapshot tests in modules.
    static func withProductionAssets(
        bundle: Bundle,
        fontBundle: TestFontBundle,
        failOnMissingAsset: Bool = true
    ) -> FakeAppAssetsProvider {
        let provider = FakeAppAssetsProvider()

        provider.imageProvider = { imageName in
            if let image = UIImage(named: imageName, in: bundle, compatibleWith: nil) {
                return AppImage(image: image)
            }
            if failOnMissingAsset {
                preconditionFailure("⚠️ TestAsset not found for '\\(imageName)' -- run `make projgen`.")
            }
            return AppImage(image: UIImage())
        }

        provider.fontProvider = { fontName in
            AppFont(/* resolves from the copied font files */)
        }

        // Set up all the app assets and styles

        return provider
    }
}
public extension FakeAppAssetsProvider {
/// Returns a fake configured to load production assets from the caller's
/// test bundle (typically `Bundle.module`). Used by snapshot tests in modules.
static func withProductionAssets(
bundle: Bundle,
fontBundle: TestFontBundle,
failOnMissingAsset: Bool = true
) -> FakeAppAssetsProvider {
let provider = FakeAppAssetsProvider()
provider.imageProvider = { imageName in
if let image = UIImage(named: imageName, in: bundle, compatibleWith: nil) {
return AppImage(image: image)
}
if failOnMissingAsset {
preconditionFailure("⚠️ TestAsset not found for '\\(imageName)' -- run `make projgen`.")
}
return AppImage(image: UIImage())
}
provider.fontProvider = { fontName in
AppFont(/* resolves from the copied font files */)
}
// Set up all the app assets and styles
return provider
}
}And all of that regenerated automatically, each time a project files generation script is run!

A small but important detail is the failOnMissingAsset flag, paired with a helpful precondition message. When someone renames an asset in production without regenerating the test bundle, the test fails outright instead of silently rendering a blank image. This asset bundle is always regenerated on CI, but locally? Suffice to say, this failure has saved us a lot of time investigating mysterious snapshot test failures…
Fair warning: the font handling took a few rounds to get right. Registering custom fonts inside a test bundle is finicky – fonts must be registered once per process, the PostScript names need to match what SwiftUI expects, and Bundle.module doesn’t always behave the way you’d hope across different test targets. The shape of the final code is straightforward, but the path to it involved more swearing than the script suggests.
With both pieces in place, the modules could finally do something the main target had never been able to do: render real production UI in isolated, fast, and comprehensive tests. More on the topic in my post about best practices in testing SwiftUI and UIKit views.
These two completed stages weren’t the true migration. They merely laid the foundation for it. Finally, we reached the point where modules stopped being a place to hide utilities and started being containers for real product features. And that was exactly what we did next.
Stage 5a: A Production Feature Inside a Module
By this point we had the foundation: utility modules, a DeviceSync module with clean boundaries, a styling system that worked across module borders, and tests that could render real UI in isolation. The only thing we needed was a proof we could build a complete app feature in that module. A living, breathing example that it could be done.
So we built one: a flow to set up a device to connect to and synchronize with the application.
It was the perfect candidate: self-contained, business-critical, and made up of six screens of guided onboarding. It included real Bluetooth interactions, graceful error handling, analytics, and local persistence interactions. If we could ship this entirely from inside the module, we could do it for any other app feature too. The goal was to prove that one full vertical slice could live in a module: views, view models, use cases, repositories, and more. And the main app would barely notice.
But what does self-contained actually mean? From the main app’s perspective, it can be summed up like this: My dear feature, I’ll set you up and give you a UI container to deploy into. Have fun, and let me know when you’re done! That’s it. How the flow is set up, what screens it shows (and in what order), what it does under the hood – it just became the module’s implementation detail.
The module’s entire public surface is a coordinator and a callback:
public final class MeterDeviceSetupCoordinator {
    public init(
        navigationController: UINavigationController,
        onFinished: @escaping () -> Void
    )
    public func start()
}
public final class MeterDeviceSetupCoordinator {
public init(
navigationController: UINavigationController,
onFinished: @escaping () -> Void
)
public func start()
}From the main app, integration looks like this:
let coordinator = DeviceSetupCoordinator(
    navigationController: navController,
    onFinished: { [weak self] result in
	      // Update UI and trigger subsequent app flows.
    }
)
coordinator.start()
let coordinator = DeviceSetupCoordinator(
navigationController: navController,
onFinished: { [weak self] result in
// Update UI and trigger subsequent app flows.
}
)
coordinator.start()Provide the NavigationController and wait for the callback. The main app never imports a view, a view model, or a repository from the module. It doesn’t need to know they exist.
That was the moment something clicked for the team. A whole, non-trivial feature, reduced to a single object with a single method and a single callback. The kind of thing you read about in architecture books but rarely see in a real production codebase you can actually point at.

Stage 5b: Inside the DeviceSync Module
So what does the inside of DeviceSync module actually look like? Three patterns hold it together:
- A DI container for resolving global services,
- Environment-injected styling for the SwiftUI views,
- Protocol-driven MVVM, with a coordinator owning the navigation.
Surprised? Too mundane? It’s simply what has worked throughout iOS development history: clear separation of responsibilities and manual control over the navigation stack.
Anything the module needs from the outside world – repositories, analytics, the device SDK, and so on – is resolved through the app’s DI container. The module declares its needs through protocols, and the main target registers concrete implementations at app startup. The module does not know, or care, which implementations are injected. It does not need to. I cover this approach in more depth in my post on dependency injection in modular iOS apps and conversion to @Observable.
In practice this means a use case lives in the module and accepts its dependencies via the initializer:
public final class LiveScanForMeterDeviceUseCase: ScanForMeterDeviceUseCase {
    private let deviceRepository: DeviceRepository

    public init(
        deviceRepository: DeviceRepository = DIContainer.resolver()
    ) {
        self.deviceRepository = deviceRepository
    }

    public func scan() async throws -> DiscoveredDevice { /* ... */ }
}
public final class LiveScanForMeterDeviceUseCase: ScanForMeterDeviceUseCase {
private let deviceRepository: DeviceRepository
public init(
deviceRepository: DeviceRepository = DIContainer.resolver()
) {
self.deviceRepository = deviceRepository
}
public func scan() async throws -> DiscoveredDevice { /* ... */ }
}The coordinator wires the use case up when constructing each view model. The deviceRepository is resolved from the DI container. Although it lives in the DeviceSync module, it is created, set up, and registered for DI in the main app target. Through DI, it is accessible to any component in the app that depends on the DeviceRepository protocol.
With DI in place, let’s discuss navigation. It’s implemented in UIKit, which makes sense given that the app was built when SwiftUI was still in its infancy. That doesn’t stop us from using SwiftUI for individual views. We just need to wrap them in UIHostingController.
Each screen has three things:
- A view model protocol declaring what the view needs and what actions it can fire.
- A Live implementation of that protocol, owned by the coordinator.
- A SwiftUI view generic over the protocol.
Here is the view model pattern:
protocol SetupMeterDeviceViewModel: Observable, AnyObject {
    var viewState: SetupDeviceView.State { get }
    ...
    func getHelp()
    func goBack()
    func close()
}

@Observable
final class LiveSetupMeterDeviceViewModel: SetupDeviceViewModel {
    private(set) var viewState: SetupDeviceView.State = .loading

    // Callbacks set by the Coordinator:
    @ObservationIgnored var onGetHelp: (() -> Void)?
    @ObservationIgnored var onGoBack: (() -> Void)?
    @ObservationIgnored var onClose: (() -> Void)?

		// Methods called by the View:
    func getHelp() { onGetHelp?() }
    func goBack() { onGoBack?() }
    func close() { onClose?() }
}
protocol SetupMeterDeviceViewModel: Observable, AnyObject {
var viewState: SetupDeviceView.State { get }
...
func getHelp()
func goBack()
func close()
}
@Observable
final class LiveSetupMeterDeviceViewModel: SetupDeviceViewModel {
private(set) var viewState: SetupDeviceView.State = .loading
// Callbacks set by the Coordinator:
@ObservationIgnored var onGetHelp: (() -> Void)?
@ObservationIgnored var onGoBack: (() -> Void)?
@ObservationIgnored var onClose: (() -> Void)?
// Methods called by the View:
func getHelp() { onGetHelp?() }
func goBack() { onGoBack?() }
func close() { onClose?() }
}The view model knows nothing about navigation – it just exposes callbacks. The Coordinator binds them when it instantiates the screen:
func showSetupDevice() {
    let viewModel = LiveSetupMeterDeviceViewModel()
    viewModel.onGetHelp   = { [weak self] in self?.requestHelp() }
    viewModel.onGoBack    = { [weak self] in self?.popBack() }
    viewModel.onClose     = { [weak self] in self?.dismiss() }

    let view = SetupDeviceView(viewModel: viewModel)
    push(makeHostingController(rootView: view))
}
func showSetupDevice() {
let viewModel = LiveSetupMeterDeviceViewModel()
viewModel.onGetHelp = { [weak self] in self?.requestHelp() }
viewModel.onGoBack = { [weak self] in self?.popBack() }
viewModel.onClose = { [weak self] in self?.dismiss() }
let view = SetupDeviceView(viewModel: viewModel)
push(makeHostingController(rootView: view))
}makeHostingController(rootView:) is where the @Environment wiring happens. The coordinator resolves the providers from DI, then injects them at the SwiftUI boundary for every screen it presents:
private func makeHostingController(rootView: some View) -> UIHostingController {
    let wrapped = rootView
        .environment(\\.appStyle,        appStyleProvider)
        .environment(\\.appAssets,       appAssetsProvider)
        .environment(\\.traitCollection, traitCollectionProvider)
        .anyView

    return UIHostingController(rootView: wrapped)
}
private func makeHostingController(rootView: some View) -> UIHostingController {
let wrapped = rootView
.environment(\\.appStyle, appStyleProvider)
.environment(\\.appAssets, appAssetsProvider)
.environment(\\.traitCollection, traitCollectionProvider)
.anyView
return UIHostingController(rootView: wrapped)
} The view simply consumes them by declaring e.g. @Environment(\\.appStyle) and using, for example, appStyle.colors.primary to render the primary CTA button background. The view has no idea that the values came from outside the module.

That’s the whole pattern. Repeat it for every screen in the flow. The Coordinator becomes a flat list of showX() methods, each one wiring callbacks to specific navigation transitions. No reactive state machine, no event bus, no shared mutable state. Just direct, traceable navigation logic that any developer joining the project can follow on a first read. And so can any AI coding assistant!
AI Changes the Math
By the time we were ready to build the first end-to-end flow inside the module, the team had a real debate on its hands. Not about whether to do it – that was settled. About how.
We could write the flow the classic way: splitting the flow into individual views, creating appropriate tasks with user stories, manually implementing designs from Figma, implementing associated business logic, writing tests, fixing issues, etc. Slow, steady, reliable. Easy to estimate too.
But we’ve decided to go the route less traveled. At least, at the time. We invested 1-2 weeks in teaching an AI to do most of that for us:
- Set up project-wide, model-agnostic rules:
At the time, we simply did not know which AI assistant would prove most efficient – so we made the rules portable across all of them. - Write skills for the specific patterns:
E.g. Fetching app style in views via@Environment, implementing callback-based flowCoordinator, or snapshot tests setups for said views. - Connect AI assistant to Figma:
We did not expect picture-perfect views, but even pulling image assets or properly recognising UI component styles would have helped us a lot. - Build commands and agents for the repetitive parts:
Identifying gaps in code coverage, cleaning up unit tests, rewriting inline documentation, composing commit messages, etc. More on the broader pattern of using AI to enforce coding standards.
The skeptics on the team had a fair point: that’s a lot of setup for an unknown payoff. What if the AI just produced decent-looking code that didn’t work as intended? What if it followed every project rule except the important one? What if we spent two weeks tuning prompts and the result was a marginal improvement we could have gotten by just typing faster?

As most AI-assisted coding best practices recommend, we started by drafting a proper implementation plan. Naturally, we did not write it ourselves. We merely provided the AI with the business context of the feature: the glossary, navigation flows, edge cases, and references to the Figma designs. We did not need to provide any technical or architectural context because it already lived in the AI context files and skills.
The AI assistant’s first output was jaw-dropping. It produced six SwiftUI screens, their view models, the coordinator wiring, the use cases, and the tests. Most views and view models came back with near-100% code coverage on the first pass. The use cases were clear and well-defined, exposing a modern async API. The views used @Environment(\\.appStyle) correctly. Some of the snapshot tests already applied production styling through the FakeAppAssetsProvider ! The coordinator wired its callbacks exactly as the project rules required. It all looked really well.
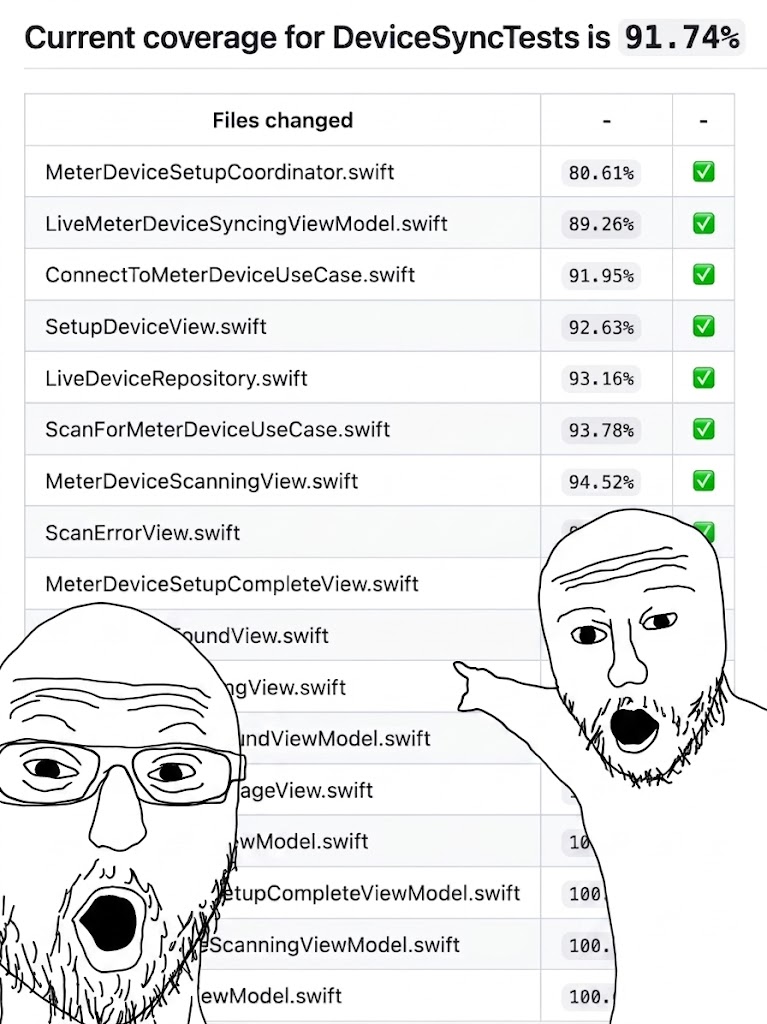
It wasn’t perfect. Some views had inaccurate copy. Some assets were only partially exported or had unnatural proportions. Some buttons were not hooked up. Some screens led to the wrong parts of the flow. At first, we also had a problem fetching the device serial number before pairing. But all of that was fully expected. Even if the feature had worked perfectly on the first try, we still would have needed to go screen by screen and verify that everything matched the designs and performed its function.
The shocking part was how well the AI followed the rules. How deeply it understood complicated business and technical concepts like the meter, the connection process, the SDK API, and the screens and navigation paths between them. Although we had put all of that in the development plan and AI context files, seeing that work pay off so quickly was still a surprise.
The AI is not magic. It is a very fast, very literal junior engineer that is eager to read and memorize the project rules, feature requirements, codebase, and designs. If you instruct it well, the time it can save you is mind-blowing. Normally, a moderately complicated feature (like first-time device setup) would take an experienced developer at least a full sprint to complete. And that does not include fixing issues found by QA. With AI, the same work can be done in a matter of days, without sacrificing code quality. The work ratio for developers is shifting permanently. Most of our time is now spent engineering requirements, tweaking AI context or skills, and reviewing and refining code produced by AI.
One thing worth making clear: this only worked because we had done a lot of prep work before starting this feature. When we first introduced AI context files a couple of months earlier, the results were very different. It took persistent iteration on our skills, commands, agents, and context to get reliable output. Thanks to that work, the AI knew what was expected technically, and which tools to use to achieve it. The AI could not have figured out how to implement cross-modular styling, even if it had read my blog post about it. It could only repeat patterns we had already discovered and codified. And that’s precisely why investing in teaching AI how to proceed always pays off in the long run.
Summary
We started with a five-year-old iOS app, a fleet of 1500-line RxSwift view models, and a deceptively simple ticket. We ended with one full feature shipping from inside a module. And a clear, repeatable path for migrating others.
By creating the Common and CommonUI modules, we defined them as Clean Code only zones. Every migrated piece of code followed two non-negotiable rules: add tests, and strip RxSwift where it was safe. Boy-Scout Rule 101. Naturally, sometimes it was not possible to remove all of the RxSwift from migrated code, and that was all right. As long as the code was testable, pragmatism should always prevail over artificial purity.
The next step was letting UI in the modules consume the application style. We defined style abstractions in the CommonUI module, filled them with production values and assets in the main app, and made them available everywhere through DI. The final step was making modular UI testable by exposing the app style to the modules’ tests. A nifty, AI-generated script took care of that.
Finally, teaching AI about our project paid off in a big way. By spending weeks tuning project AI rules, skills, commands, and agents, we shaved months off development time.
Before you get all excited and jump into modularising your own legacy app, be mindful of the business impact. The migration described here took a quarter. It worked because we had buy-in, because the set up my device feature was business-critical, and because we didn’t try to migrate everything at once.
My advice? Start small. Pick the next piece of code you’re about to touch anyway, and extract it properly – with tests, in a module, with the Rx stripped if it’s safe. Then do it again next week.
A different life is possible for your codebase too. The hardest part is just deciding to start.
Don’t miss any new blogposts!
By subscribing, you agree with our privacy policy and our terms and conditions.
Disclaimer: All memes used in the post were made for fun and educational purposes only
They were not meant to offend anyone
All copyrights belong to their respective owners
The thumbnail was generated with text2image
Some images were generated using Leonardo AI
Audio version generated with TTS Maker


